

Advanced
Optional hardening and branding for a production Keycloak integration with Ver.iD.
Each section below is independent. Complete the setup guide first; every section builds on the provider, attributes and client scope it creates.
Add another scope
Every scope follows the same recipe. The claims each scope returns, their paths and the wallets that supply them are listed under Scopes and claims.
- In Studio, deactivate the flow, add the scope to every wallet that supports it, activate the flow again and test it with the new scope.
- In Keycloak, open Identity providers → verid → OpenID Connect settings → Advanced and add the scope to Scopes, for example
openid email phone nin. - Create one user profile attribute and one Attribute Importer mapper per claim, as in step 4. Nested claims use dot notation in the Claim field.
- Add a User Attribute mapper to
verid-wallet-claimsfor each attribute your applications need. - Repeat the login test and check the new attributes on the user.
Ver.iD returns claims in three shapes:
| Shape | Scopes | Claim path example | Keycloak attribute value |
|---|---|---|---|
| String | profile, email, phone, birthdate, birth-country | given_name | The string |
| Boolean | email, phone | phone_number_verified | true or false |
| Nested object | address, company, nin, testNin | nin.identifier | The nested value |
For the nin scope, for example, create the attributes verid_nin and verid_nin_type and map nin.identifier and nin.identifier_type to them.
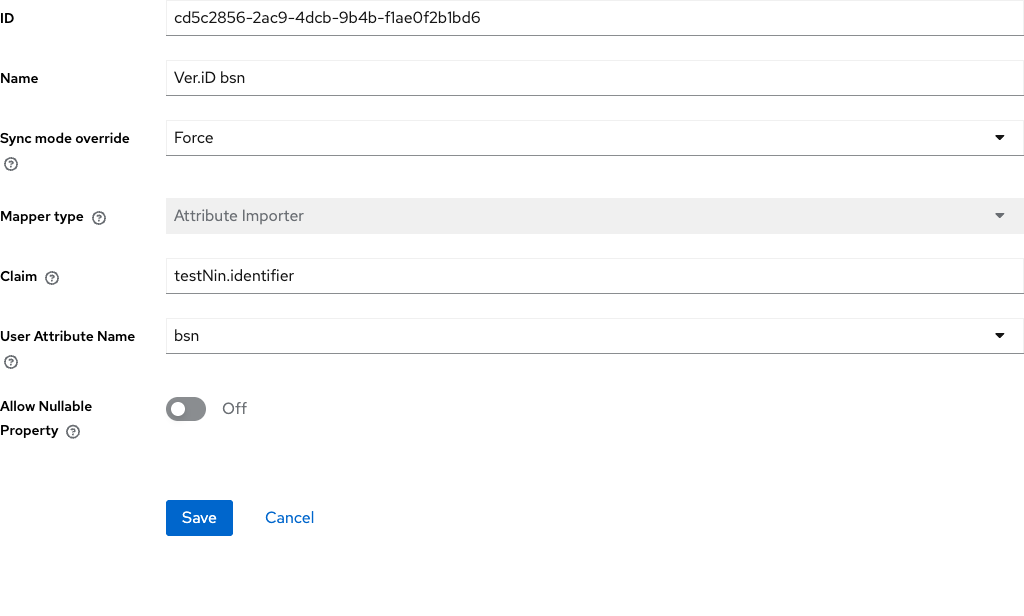
The capture shows the demo claim path testNin.identifier; a mapper for
nin.identifier is configured the same way.
Skip the Keycloak login page
An application can send its users straight to the wallet by adding the identity provider hint to the authorization request it sends to Keycloak:
kc_idp_hint=veridKeycloak then redirects to Ver.iD without showing its own login page. The wallet button stays available on the login page for users who arrive without the hint.
Require verified claims
A post-login flow checks the imported attributes after every wallet login and denies the login when a value is missing or unverified. The example below requires a verified email address and a verified phone number.
- Open Authentication → Flows → Create flow. Name it
verid-require-verified-contact, choose Basic flow explicitly, and click Create. - Add four sub-flows with Add sub-flow, type Generic, and set each to Conditional:
Missing email,Email not verified,Missing phone,Phone not verified. - Inside each sub-flow, use Add condition to add Condition - user attribute and Add execution to add Deny access. Set both to Required.
- Open each condition's settings and enter the values below. Set Negate output = On and Include group attributes = Off in all four.
| Sub-flow | Alias | Attribute name | Expected attribute value | regex |
|---|---|---|---|---|
| Missing email | check-email | verid_email | .+ | On |
| Email not verified | check-email-verified | verid_email_verified | true | Off |
| Missing phone | check-phone | verid_phone_number | .+ | On |
| Phone not verified | check-phone-verified | verid_phone_number_verified | true | Off |
- At the top level, after the four sub-flows, use Add execution to add Allow access and set it to Required.
verid-require-verified-contact
├── Missing email                   Conditional
│   ├── Condition - user attribute  Required
│   └── Deny access                 Required
├── Email not verified              Conditional
│   ├── Condition - user attribute  Required
│   └── Deny access                 Required
├── Missing phone                   Conditional
│   ├── Condition - user attribute  Required
│   └── Deny access                 Required
├── Phone not verified              Conditional
│   ├── Condition - user attribute  Required
│   └── Deny access                 Required
└── Allow access Required- Open Identity providers → verid, scroll to Advanced settings, set Post login flow to
verid-require-verified-contact, and click Save.
Negate output activates a sub-flow when the attribute is missing or fails its check, and Deny access then stops the login. The two value checks only require a non-empty value; they do not validate email or phone number formats.
To test the deny branch, temporarily remove phone from the provider's Scopes field and sign in again in a private window. Force sync removes the phone attributes and the login is denied, including for a user who signed in successfully before. Restore the scope afterwards.
The post-login flow runs only on a wallet login. An existing Keycloak session skips both the wallet and these checks.
Control account linking
The verid-first-login flow from step 3 decides what happens when a wallet identity arrives for the first time:
- A wallet identity that matches no user creates a new user.
- A wallet identity whose email matches an existing user shows Confirm link existing account. The user must then authenticate with their password or second factor before the link is made.
Keep that confirmation. Email addresses and phone numbers can change hands, so a matching contact value alone must never link accounts.
Ver.iD derives its pairwise subject from the claims it returns for the client. When a user's contact data changes, the subject changes with it and Keycloak sees a new wallet identity. The user links it to their existing account through the same confirmation step, so keep a password or second factor available on every account.
To link a wallet to an existing account on purpose, sign in to the Account Console with that account, open Account security → Linked accounts, and click Link account next to Log in with Digital Identity Wallet. The user ID is retained.
Customize the login button
The Ver.iD login theme adds a wallet icon and a two-line Log in with / Digital Identity Wallet label to the provider button. It extends the standard keycloak login theme and has been checked on Keycloak 24.0.1, 25.0.6 and 26.8.1.
Download the Ver.iD login theme (ZIP)
Install the theme
-
Download and extract the ZIP. It contains a
veriddirectory. -
Place that directory under your Keycloak installation's
themesdirectory. In the official container, the resulting path is/opt/keycloak/themes/verid/login/theme.properties. For a custom image, add this line after extracting the ZIP into your build context:COPY --chown=1000:0 verid/ /opt/keycloak/themes/verid/ -
Deploy the theme to every Keycloak instance and restart Keycloak.
-
In the Admin Console, select the realm, open Realm settings → Themes, set Login theme to verid and click Save.
-
Keep the identity provider's Alias set to
veridand repeat the login test to check the button.
Use the button in your own theme
If you maintain a login theme, copy these files from the ZIP into the corresponding paths under your theme's login directory:
resources/css/verid-button.cssresources/js/verid-button.jsresources/img/verid-wallet-icon.svg
In your theme's login/theme.properties, append these entries to the existing space-separated values:
| Property | Append |
|---|---|
styles | css/verid-button.css |
scripts | js/verid-button.js |
If your theme inherits styles or scripts, keep the inherited entries. For example, when extending keycloak without an existing styles setting:
styles=css/login.css css/verid-button.cssYour theme's provider link for alias verid must have id="social-verid". Keep Keycloak's generated login URL in the link's href; the script updates the button's contents and retains that URL. The button text and accessible label are set in verid-button.js; the provider's Display name does not override them.
Separate acceptance and production
Use one Studio authentication flow and one Keycloak realm per environment, so test credentials and callbacks never reach production.
| Environment | Studio flow | Keycloak |
|---|---|---|
| Acceptance | Acceptance flow with the acceptance realm's broker callback and, if used, Studio's test callback | Acceptance realm with provider verid |
| Production | Production flow with the production realm's broker callback only | Production realm with provider verid |
Before enabling the production flow: